...
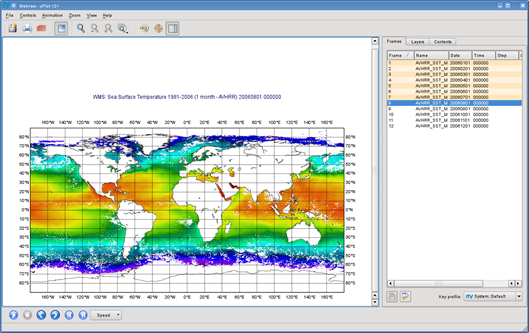
The list in the tab shows you the values of a set of meta-data keys for each animation frame (i.e. for each image). To see the key names just put the cursor into the column headings. The keys used here are basically GRIB API keys but WMS parameters are mapped to them (see the table below for details).
Frame keys can be grouped into ‘key profiles’. At the bottom of the tab there is a combo box to switch between the existing key profiles. To manage the key profiles (e.g. to add your own profiles) please try the Key profile manager dialog that can be launched by the button with a spanner icon next to the key profile selector combo box.
...
Remarks:
· As a general rule multiple dimension values can be specified as a comma separated list. This is also true for dimension Time so our time selection could have been written as:
2006-01-01,2006-02-01,2006-03-01,2006-04-01,2006-05-01,2006-06-01,2006-07-01,2006-08-01,2006-09-01,2006-10-01,2006-11-01,2006-12-01
Please note that white spaces are not allowed between the commas and the values!
· The following table summarises how the WMS parameters are mapped to frame keys in Metview.
Layer name | shortName |
Date part of dimension TIME | date, dataDate, time.dataDate |
Time part of dimension TIME | time, dataTime, time.DataTime |
Date part of dimension DIM_RUN | date, dataDate, time.dataDate |
Date part of dimension DIM_RUN | time, dataTime, time.DataTime |
Dimension DIM_FORECAST | step, stepRange, time.stepRange |
Dimension ELEVATION | level, vertical.level |
Part 4 – Editing WMS Requests Manually
The WMS client’s user interface offers two WMS request editing modes: an interactive and a plain mode. So far we have used the interactive mode and it provided us with a high-level user interface to set the parameters and build the request automatically whenever it is possible. However, occasionally there might be a need for changing some request parameters manually and this is exactly what the plain editing mode can be used for.
In folder ‘wms_tutorial’ duplicate your ‘NASA’ WMS Client icon and rename the duplicate ‘NASA plain’. Edit it and find the combo box in the bottom left corner of the user interface.
Now select option “Plain” from the combo box to enter the plain editing mode. You should see the following user interface:
Remarks:
- As a general rule multiple dimension values can be specified as a comma separated list. This is also true for dimension Time so our time selection could have been written as:
2006-01-01,2006-02-01,2006-03-01,2006-04-01,2006-05-01,2006-06-01,2006-07-01,2006-08-01,2006-09-01,2006-10-01,2006-11-01,2006-12-01
Please note that white spaces are not allowed between the commas and the values! - The following table summarises how the WMS parameters are mapped to frame keys in Metview.
Layer name | shortName |
Date part of dimension TIME | date, dataDate, time.dataDate |
Time part of dimension TIME | time, dataTime, time.DataTime |
Date part of dimension DIM_RUN | date, dataDate, time.dataDate |
Date part of dimension DIM_RUN | time, dataTime, time.DataTime |
Dimension DIM_FORECAST | step, stepRange, time.stepRange |
Dimension ELEVATION | level, vertical.level |
Part 4 – Editing WMS Requests Manually
The WMS client’s user interface offers two WMS request editing modes: an interactive and a plain mode. So far we have used the interactive mode and it provided us with a high-level user interface to set the parameters and build the request automatically whenever it is possible. However, occasionally there might be a need for changing some request parameters manually and this is exactly what the plain editing mode can be used for.
In folder ‘wms_tutorial’ duplicate your ‘NASA’ WMS Client icon and rename the duplicate ‘NASA plain’. Edit it and find the combo box in the bottom left corner of the user interface.

Now select option “Plain” from the combo box to enter the plain editing mode. You should see the following user interface:

The editable WMS request parameters are listed on the left hand side of the interface. Whenever you edit a parameter the WMS request displayed on the right hand side of the interface is immediately updated.
To demonstrate the editor’s capabilities we will change parameter Time by adding an another date to it. Now change parameter Time and type in the following text into its editor:
2006-11-01,2006-12-01
...
From Part 3 we know that the date we added (November 2006) is a valid date. We also know that Time is a WMS dimension so the specification of multiple values results in multiple map images. Thus you have just defined two WMS requests (i.e. two animation frames for Metview) as shown below:
...