...
Resizing the screen and shared folders
Resizing screen automatically
To have the monitor size in the virtual machine change size automatically as the virtual machine window is resized, select the 'Auto resize' option from the View menu when the virtual machine is active.
...
In order for this to work, some additional software might need to be installed on the virtual machine, known as Guest Additions. If this doesn't work, try installing (or reinstalling) the guest additions software.
Change default screen size
The first time the virtual machine (VM) is started, the screen size may be set to 1024x768 pixels.
To change the screen size requires changing the desktop settings in the Linux virtual machine (similar to any Linux desktop)
- Start up the virtual machine and let it start up fully.
- Resize the VM window to the required size.
- In the bottom left corner, find the openSUSE icon
 and click it.
 - Then select 'Applications' and 'Configure Desktop':

- On the window that appears, find the icon labelled 'Display and Monitor' and click it.
- On the display window, click 'Size & Orientation' in the left bar (if not selected).
In the middle panel, find the 'Size' menu:
- Select the largest size on this menu. It should match the resized window from step 2.

- Click 'Apply' to set the new resolution:

- Confirm the change and you're done.
Shared folders
Shared folders enable the host and guest machines to share files via a common folder (directory).
...
To install or re-install Guest Additions follow these instructions.
Check guest additions are installed
To check if guest additions is already installed run the following command:
...
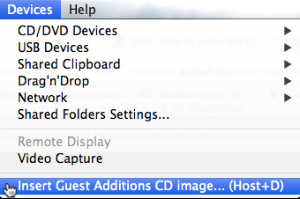
- Start up the virtual machine (VM) and let it start up fully.With the VM the active window, select the 'Devices' menu and the 'Install guest additions CD image..
A popup window should appear in the virtual machine showing the CD.In the virtual machine, open a Terminal window from the openSUSE icon and 'Applications' First check that the necessary kernel files are installed:
Code Block zypper search kernel-devel
If not, install them with the command:
Code Block sudo zypper install kernel-devel
The installation needs to be done as the root user. This command will prompt for the root password '
metv1ew!'- With the VM the active window, select the 'Devices' menu and the 'Install guest additions CD image..
A popup window should appear in the virtual machine showing the CD. - In the virtual machine, open a Terminal window from the openSUSE icon and 'Applications' menu

In the Terminal, change to the directory where the VBoxAdditions CD was mounted. This will be under the /run/media directory, followed by the username.
, type the following command to change directory to the mounted CD:Code Block title e.g. code
cd /run/media/openifs/VBOXADDITIONS_4.3.34_104062
Note! The name of the VBOXADDITIONS directory may be different. The version number follows the directory name.
Note! The name 'openifs' in the above directory is the username. If this is not the right filename, open the filebrowser and select the mounted CD.To start the installation of the Guest Additions, type the following command into the Terminal:
Code Block sudo ./VBoxLinuxAdditions.run
This will prompt for the root password, usually
'metv1ew!'
Adjusting the screen size
The first time the virtual machine (VM) is started, the screen size may be set to 1024x768 pixels.
To change the screen size requires changing the desktop settings in the Linux virtual machine (similar to any Linux desktop)
Info The installation may report that Guest Additions is already installed and ask you to confirm.
The installation only takes a few minutes.
- Reboot the virtual machine for the changes to take effect.
Check that the user accounts have access to the shared folder. The shared folder is usually mounted in the
/mediadirectory:Code Block % ls -l /media drwxrwx--- 1 root vboxsf 170 Jun 2 2014 sf_shared_folderIn the above example, the VirtualBox settings have used a shared folder name of
'shared_folder'.
For users to read/write to this directory, they must be in the'vboxsf'group. Look in the/etc/groupfile to check:Code Block % grep vboxsf /etc/group vboxsf:x:493:openifs,metviewIf the usernames are missing, add them using these commands:
Code Block sudo usermod -a -G vboxsf openifs sudo usermod -a -G vboxsf metviewInfo Please note that the user 'openifs' does not exist on the earlier OpenIFS Virtual Machines
- Start up the virtual machine and let it start up fully.
- Resize the VM window to the required size.
- In the bottom left corner, find the openSUSE icon and click it.
- Then select 'Applications' and 'Configure Desktop':
- On the window that appears, find the icon labelled 'Display and Monitor' and click it.
- On the display window, click 'Size & Orientation' in the left bar (if not selected).
In the middle panel, find the 'Size' menu: - Select the largest size on this menu. It should match the resized window from step 2.
- Click 'Apply' to set the new resolution:
- Confirm the change and you're done
.