Getting Data into Metview
Copying files and creating links
By default, Metview can only see files under the $HOME/metview directory. You can select a different home directory for Metview (-u option on the Metview startup command line), but you can also copy files into this directory (or a sub-directory of it) or create links to external data files - this can be useful if you have large data files which would exceed the quota in your home directory.
One way is to do this from a shell command line (ln command), but Metview can also create these links for you.
Right-click an empty spot in the Metview desktop and choose Create New… Link to File and type /home/ectrain/trx/mv_data/ztuv.grb into the File name box (or navigate there and select the file with the mouse). Note that the text label under the new icon is in italics, and there is an arrow in the bottom-left corner - these indicate that this is a link; if you hover the mouse cursor over the icon, the link details will be shown in the status bar. The padlock in the bottom-right corner tells us that this file is read-only. This file contains analysis and 1, 2, 3, 4 and 5-day forecasts for geopotential, temperature and wind at various pressure levels – visualise it to see for yourself.
You can create links to individual files or complete folders. This facility can be used to share folders between users.
Retrieving data from MARS
Metview has the ability to retrieve data directly from the ECMWF MARS archive (or indeed any other MARS archive installed outside ECMWF).
Create a new Mars Retrieval icon. Edit it and set only the following:
| Grid | 1.5/1.5 |
This ensures that the data is transformed onto a regular 1.5 degree grid. Much of Metview's functionality relies on GRIB data being on a grid (regular or quasi-regular) and not stored as spherical harmonics.
If you look at the other parameters in the icon editor, you will see that by default, it will retrieve analysis data (Type = An) of geopotential (Param = Z) on six pressure levels (Levelist = 1000/850/700/500/400/300) for yesterday (Date = -1).
Save the icon, then visualise it. The data should be retrieved, then visualised. From the titles of the different fields in the plot you can confirm that it is the correct data.
We will see in Processing Data how we can manipulate the data returned from MARS.
Accessing MARS through the Web API
XXXXXXXXXXXXXXXXXX
Icon Feedback
The Mars Retrieval icon gives us the opportunity to explore another feature of Metview. The colour of an icon’s text label tells us which state it is in:
Black | No operation executed since last save (default) |
Orange | Operation in progress, e.g. waiting for data retrieval from database |
Green | Operation successfully executed, data may be cached for some icons |
Red | Operation failed, e.g. due to invalid input parameters |
The icon should currently be green, meaning that if you visualise it (or perform any other action on it), the data will not be retrieved again - the cached copy will be used instead. There are two ways to un-cache the data:
- edit the icon and change at least one parameter (in this case, the cached data will no longer match the retrieval request, so it is deleted)
- right-click on the icon and select Clear result
Use the second technique, then execute the icon and observe as the colour of its name changes.
Icon Output
By now you should have generated some log message, probably when you performed the MARS retrieval. Each icon has its own text output which can be viewed by selecting Log from the icon’s right-click menu. This is only enabled when there is output for that icon, and is reset when the icon’s contents change. Have a look at the log messages for the Mars Retrieval icon (ensure that you have retrieved data first).
You can view a complete history of output from all icons by selecting Log from the Tools menu in any Metview desktop.
For an even more detailed output, you can start Metview on the command line with the ‘-slog’ option - this will write lots of information to your terminal window. This information can be useful when reporting a problem to the Metview team! ‘metview -h’ gives a list of all useful command line options and environment variables.
Field Data in GRIB Files
ECMWF's model output fields are stored in GRIB format, so that is where much of Metview's functionality lies. The following sections will introduce some of the data inspection facilities available.
Examining GRIB Meta-data
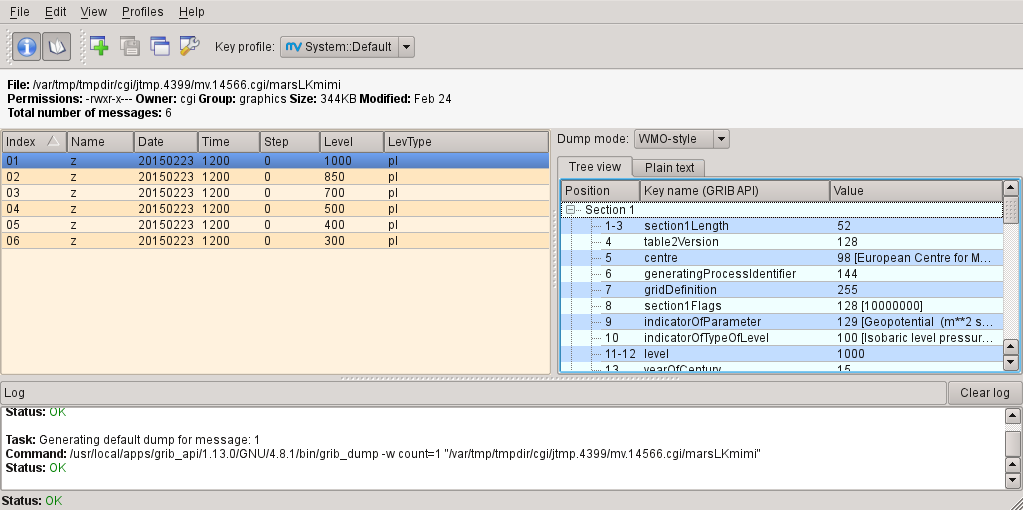
Right-click and Examine the Mars Retrieval icon (if for some reason the retrieval did not work, or you do not have access to MARS, then use ztuv.grb instead).
GRIB file. In this case we have 6 fields (messages) in the file, each represented by a row in the message list on the left-hand side. The right-hand side shows detailed meta-information for the selected message, presented in a number of different ways (try changing between Tree view and Plain text; try different Dump modes). You can sort the fields by clicking on the different column headers. The GRIB examiner can be customised – see the extra tasks for this chapter, as this is an advanced topic.
Extra Tasks
Try the search facilities in the data examiners
Examine the GRIB file and the BUFR file; press CTRL-F to initiate the search. Look carefully at the options!
Create your own GRIB Examiner key profile
When you examine a GRIB file, a list of 'keys' is used to display the GRIB messages - one key per column. These columns are configurable - a 'key profile' is a set of keys, and you can create as many of them as you want. It can be very useful to have different key profiles for different tasks. From the user interface in the GRIB Examiner, create a new key profile; starting either from scratch, or else from a duplicate of the default profile. Note that the Display Window also operates on the same principles, and you can share key profiles between the two.
Derive 500/1000 relative topography in metres from zutv.grb for all the available dates
Hints:
- use the Simple Formula icon to compute the 500/1000 relative topography (it is the difference between 500 hPa and 1000 hPa geopotential)
- use another Simple Formula icon to convert the units to metres (geopotential is given in m2/s2 units instead of metres. You can get metres after dividing the geopotential values by 9.81)
Comment: you will see that it can be much more easily implemented in Metview Macro!
Observation filtering
Extract 2m temperature values below the freezing point from BUFR.bufr.
Hints:
- use geopoints output
- use custom filter
- temperature values are given in K
Extract the 10m wind vector for wind speeds larger than 1 m/s form BUFR.bufr
Hints:
- use geopoints polar vector output
- BUFR parameters are 011012 (speed) and 011011 (direction)
- use custom filter