...
- First make sure you have downloaded and installed VirtualBox and it starts correctly.
- Start VirtualBox and click the 'New' button:
- In the window that appears, for Name type 'openifs' (any name is fine), for Type select 'Linux', for Version select 'openSUSE (64bit)'.
- For Memory size, increase it to at least 1200Mb more if you can. Do not move the bar into the red! This will cause your computer to slow down drastically and it may even freeze.
The amount of memory on your computer may be less or more than shown in the figure below. - For Hard drive, select the option 'Use an existing virtual hard drive file'. Then click on the yellow folder icon to locate the virtual machine file. This file will have a name similar to the one shown below and always have the .vmdk extension.
- Then click on the Create button. The newly created virtual machine should now be shown in the left panel.
- Next, click on the Settings icon to change a few of the properties.
- Under the General tab, select Advanced. For Shared Clipboard, enable Bidirectional and likewise for Drag'n'Drop (your system may not support these). When set these will allow cut'n'paste of text between the virtual machine and your computer.
- If (and only if) you have a computer with multiple processors or multiple 'processor cores', you may want to increase the number of processors available to the virtual machine. To do this, in the Settings window, select System, then Processor and adjust the slider. As for memory settings, do not go into the red!
Enable Shared Folders. This allows both the virtual machine and the real computer to exchange files as both can read and writes files to any directories you specify as a shared folder.
Info In order for Shared Folders to work the 'Guest additions' software must be installed correctly. For more information, please see below.
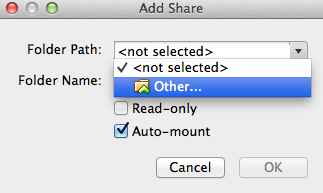
In the Settings window, select Shared Folders and click the blue folder icon with the green cross to create a new one.In the window that appears, under Folder Path select the folder or directory on the host computer that will act as a shared folder (create it if it doesn't already exist). Then under Folder Name give it a name as it will appear on the virtual machine; shared_folder might be a good choice.
Make sure that Read-only is not selected and Auto-mount is selected.Info With Auto-mount selected, the shared folder will be available when the virtual machine boots. It can normally be found in the directory /media/ with the prefix 'sf_' added to the shared folder name.
If shared folders do not appear to work in the virtual machine, it may be that some additional software 'Guest Additions' is not installed.
The version of Guest Additions installed must match the version of VirtualBox. If this is not the case, or in doubt, reinstall the Guest Additions software (see below).
- Close the Setttings box. To start the virtual machine, click the Start green arrow on the main window.
- When the virtual machine has booted, the keyboard layout can be changed by clicking on the small icon labelled 'gb' in the bottom right corner.
The default is set to a UK keyboard.
...
Resizing screen automatically
It's desirable to To have the monitor size in the virtual machine to change size automatically as the virtual machine window is resized, select the 'Auto resize' option from the View menu when the virtual machine is active.
In order for this to work, some additional software might need to be installed on the virtual machine, known as Guest Additions. If this doesn't work, try installing (or reinstalling) the guest additions software.
Shared folders
Shared folders enable the host and guest machines to share files via a common folder (directory). In order for this to work, some additional software might need to be installed on the virtual machine, known as Guest Additions.
...


