| Section | |||||||||||||||||||||||||||||||||||||||||
|---|---|---|---|---|---|---|---|---|---|---|---|---|---|---|---|---|---|---|---|---|---|---|---|---|---|---|---|---|---|---|---|---|---|---|---|---|---|---|---|---|---|
|
...
- First make sure you have downloaded and installed VirtualBox and it starts correctly.

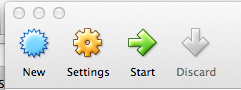
- Start VirtualBox and click the 'New' button:
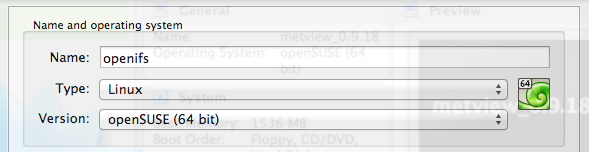
- In the window that appears, for Name type 'openifs' (any name is fine), for Type select 'Linux', for Version select 'openSUSE (64bit)'.
- For Memory size, increase it to at least 1200Mb more if you can. Do not move the bar into the red! This will cause your computer to slow down drastically and it may even freeze.
The amount of memory on your computer may be less or more than shown in the figure below.
- For Hard drive, select the option 'Use an existing virtual hard drive file'. Then click on the yellow folder icon to locate the virtual machine file. This file will have a name similar to the one shown below and always have the .vmdk extension.
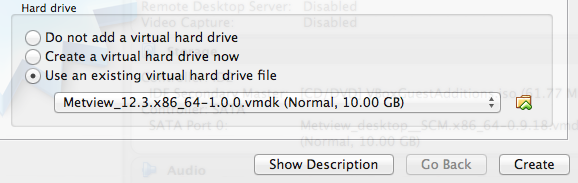
- Then click on the Create button. The newly created virtual machine should now be shown in the left panel.

- Next, click on the Settings icon to change a few of the properties.
- Under the General tab, select Advanced. For Shared Clipboard, enable Bidirectional and likewise for Drag'n'Drop (your system may not support these). When set these will allow cut'n'paste of text between the virtual machine and your computer.

- If (and only if) you have a computer with multiple processors or multiple 'processor cores', you may want to increase the number of processors available to the virtual machine. To do this, in the Settings window, select System, then Processor and adjust the slider. As for memory settings, do not go into the red!

Enable Shared Folders. This allows both the virtual machine and the real computer to exchange files as both can read and writes files to any directories you specify as a shared folder.
Info Shared folders may not always work. It relies on software known as 'VirtualBox guest additions'. Although this is installed in the OpenIFS virtual machines, it does not always work and may need re-installing. For more information, please see below.
In the Settings window, select Shared Folders and click the blue folder icon with the green cross to create a new one.
In the window that appears, under Folder Path select the folder or directory on the host computer that will act as a shared folder (create it if it doesn't already exist). Then under Folder Name give it a name as it will appear on the virtual machine; shared_folder might be a good choice.
Make sure that Read-only is not selected and Auto-mount is selected.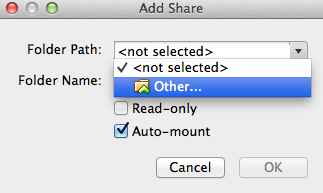
Info With Auto-mount selected, the shared folder will be available when the virtual machine boots. It can normally be found in the directory /media/ with the prefix 'sf_' added to the shared folder name.
If shared folders do not appear to work in the virtual machine, it may be that some additional software 'Guest Additions' is not installed.
The version of Guest Additions installed must match the version of VirtualBox. If this is not the case, or in doubt, reinstall the Guest Additions software (see below).
- Close the Setttings box. To start the virtual machine, click the Start green arrow on the main window.
- When the virtual machine has booted, the keyboard layout can be changed by clicking on the small icon labelled 'gb' in the bottom right corner.
The default is set to a UK keyboard.
On first boot
The first time the virtual machine (VM) boots, it may take you through a series of screens to accept the licence, configure the language, timezone and date.
Use TAB and RETURN keys to navigate through these options, the mouse will not work until the VM has fully booted.
The first screen asks you to confirm acceptance of the OpenIFS Binary Licence.
Use TAB to navigate to option to Agree to the License Terms:

Hit RETURN to select (put a X), then TAB again to Next:
 and hit RETURN to progress to the next screen.
The following screens will ask for the choice of language:

keyboard and timezone. Again use the TAB key to navigate the options (or the shortcuts highlighted in yellow) and RETURN to select the option.
These steps only need to be done on the very first boot of the virtual machine.
Resizing the screen and shared folders
...
| Code Block |
|---|
vboxsf 47936 0 vboxvideo 12669 1 vboxguest 293037 6 vboxsf drm 335594 3 vboxvideo |
Uninstall Following the install steps below will overwrite any existing guest additions installation. It should not be necessary to uninstall. However, you can uninstall guest additions by:
| Code Block |
|---|
sudo zypper rm virtualbox-guest-kmp-default virtualbox-guest-tools virtualbox-guest-x11 |
...
- Start up the virtual machine (VM) and let it start up fully.
First On the virtual machine (not the host), check that the necessary kernel files are installed:
Code Block zypper search kernel-devel
If not, install them with the command:
Code Block sudo zypper install kernel-devel
The installation needs to be done as the root user. This command will prompt for the root password '
metv1ew!'The 'make' and 'gcc' packages are also required but these are normally available by default in the OpenIFS virtual machine.
- With the virtual machine as the active window, select the 'Devices' menu and the 'Install guest additions CD image..
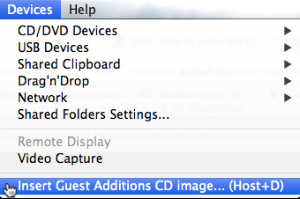
A popup window should appear in the virtual machine showing the CD.
Click the Guest Additions CD to mount it. A new folder window should appear showing the contents of the CD. - In the virtual machine, open a Terminal window from the openSUSE icon and 'Applications' menu


In the Terminal, change to the directory where the VBoxAdditions CD was mounted. This will be under the /run/media directory, followed by the username.
Code Block title e.g. cd /run/media/openifs/VBOXADDITIONS_4.3.34_104062
(older systems may use /var/run/media instead).
To start the installation of the Guest Additions, type the following in the Terminal:
Code Block sudo ./VBoxLinuxAdditions.run
This will prompt for the root password, usually
'metv1ew!'Info The installation may report that Guest Additions is already installed and ask you to confirm.
The installation only takes a few minutes.
- Reboot the virtual machine for the changes to take effect.
...
| Code Block |
|---|
cd ln -s /media/sf_shared_folder shared_folder |
...
Download OpenIFS workshop files
Some of the earlier OpenIFS virtual machines (from 2013 & 2014) came with the metview exercises and OpenIFS example forecast data already installed. For these virtual machines, there is no possibility to install the exercises from the other OpenIFS workshops.
For the 2015 and later OpenIFS workshops, download the latest version of the OpenIFS/Metview virtual machine (contact openifs-support@ecmwf.int for assistance).
Configure the virtual machine as above and let is start fully. Then:
- Open a Terminal Window
In the home directory run the command:
Code Block ./get_workshopand follow the instructions.
Please note that these workshop files are large and will take some time to download and unpack, depending on the speed of your network connection and computer.
Problems and solutions
Here's a list of possible problems and their solutions that might arise using the virtual machine.
64-bit guest OS list is not displayed
VirtualBox does not present the list of 64 bit OS when creating the virtual machine.
This might be because your computer is only 32bit. In which case you can't use the virtual machines as they are built as 64-bit.
If you have a 64bit computer, this might be because of settings in Windows 8 or 10 that conflict. Please see this article for more information on the solution http://www.fixedbyvonnie.com/2014/11/virtualbox-showing-32-bit-guest-versions-64-bit-host-os/#.VvvZBT_VmuA
VT-x is disabled in BIOS
Some users may get this error when first trying to run the virtual machine (or a similar error):
| Code Block |
|---|
"Failed to open a session for the virtual machine openifs. VT-x is disabled in the BIOS. (VERR_VMX_MSR_VMXON_DISABLED)."
|
This arises because the OpenIFS/Metview virtual machines are 64-bit which requires hardware virtualization support in the BIOS of your computer to be enabled.
There are many helpful pages on Internet forums to resolve this, see for example: http://askubuntu.com/questions/256792/how-do-i-enable-hardware-virtualization-technology-vt-x-for-use-in-virtualbox
Mac users. The above instructions apply to machines running Windows/Linux which allow access to the BIOS. On Macs, this is not possible though this issue can still occur. If you see this message on a Mac, it's likely that another application has changed the state of the VT-x hardware acceleration. In which case, a reboot of the machine usually clears it.
If none of the above solve the problem, make sure you are running the latest version of VirtualBox for your machine. Older versions of VirtualBox do not support VT-x on newer computers.
Network is not working
In some cases, it may not be possible to use the VM to connect to the outside, or connections only work to the local network. This may be due to proxies on your local network intercepting external traffic.
To solve this, configure the VM with your local network proxy settings in Yast2 > Network settings > Proxy.
Drag'n'Drop not working
Check that the Settings for the VM are set to 'Bidirectional'. Also, when the VM is running, check that the menu option "Devices" -> "Drag'n'Drop" is also set to Bidirectional.
If shared folder does not automatically mount
Mount On the virtual machine, mount the folder manually by (for example to your home directory):
...
If a system update has updated the kernel files and shared folders have stopped working, reinstall the Guest Additions software. Guest Additions adds files to the kernel and these must be reinstalled if the kernel is changed.
| Excerpt Include | ||||||
|---|---|---|---|---|---|---|
|