| Section | |||||||||||||||||||||||||||||||||||||||||
|---|---|---|---|---|---|---|---|---|---|---|---|---|---|---|---|---|---|---|---|---|---|---|---|---|---|---|---|---|---|---|---|---|---|---|---|---|---|---|---|---|---|
|
...
| Code Block |
|---|
vboxsf 47936 0 vboxvideo 12669 1 vboxguest 293037 6 vboxsf drm 335594 3 vboxvideo |
Uninstall Following the install steps below will overwrite any existing guest additions installation. It should not be necessary to uninstall. However, you can uninstall guest additions by:
| Code Block |
|---|
sudo zypper rm virtualbox-guest-kmp-default virtualbox-guest-tools virtualbox-guest-x11 |
...
- Start up the virtual machine (VM) and let it start up fully.
First On the virtual machine (not the host), check that the necessary kernel files are installed:
Code Block zypper search kernel-devel
If not, install them with the command:
Code Block sudo zypper install kernel-devel
The installation needs to be done as the root user. This command will prompt for the root password '
metv1ew!'The 'make' and 'gcc' packages are also required but these are normally available by default in the OpenIFS virtual machine.
- With the virtual machine as the active window, select the 'Devices' menu and the 'Install guest additions CD image..
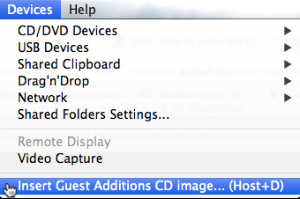
A popup window should appear in the virtual machine showing the CD.
Click the Guest Additions CD to mount it. A new folder window should appear showing the contents of the CD. - In the virtual In the virtual machine, open a Terminal window from the openSUSE icon and 'Applications' menu


In the Terminal, change to the directory where the VBoxAdditions CD was mounted. This will be under the /run/media directory, followed by the username.
Code Block title e.g. cd /run/media/openifs/VBOXADDITIONS_4.3.34_104062
(older systems may use /var/run/media instead).
To start the installation of the Guest Additions, type the following in the Terminal:
Code Block sudo ./VBoxLinuxAdditions.run
This will prompt for the root password, usually
'metv1ew!'Info The installation may report that Guest Additions is already installed and ask you to confirm.
The installation only takes a few minutes.
- Reboot the virtual machine for the changes to take effect.
...
For the 2015 and later OpenIFS workshops, download the latest version of the OpenIFS/Metview virtual machine (contact openifs-support@ecmwf.int for assistance).
Configure the virtual machine as above and let is start fully. Then:
...
If none of the above solve the problem, make sure you are running the latest version of VirtualBox for your machine. Older versions of VirtualBox do not support VT-x on newer computers.
Network is not working
In some cases, it may not be possible to use the VM to connect to the outside, or connections only work to the local network. This may be due to proxies on your local network intercepting external traffic.
To solve this, configure the VM with your local network proxy settings in Yast2 > Network settings > Proxy.
Drag'n'Drop not working
Check that the Settings for the VM are set to 'Bidirectional'. Also, when the VM is running, check that the menu option "Devices" -> "Drag'n'Drop" is also set to Bidirectional.
If shared folder does not automatically mount
Mount On the virtual machine, mount the folder manually by (for example to your home directory):
...
If a system update has updated the kernel files and shared folders have stopped working, reinstall the Guest Additions software. Guest Additions adds files to the kernel and these must be reinstalled if the kernel is changed.
| Excerpt Include | ||||||
|---|---|---|---|---|---|---|
|