The default stack enables you to manage user authentication and secure access to the machines inside an EWC tenancy. It is composed of three Items, described in the sections below.

 SSH Bastion (SSH Proxy)
The SSH proxy is the barrier between your internal machines and the public internet. With the SSH proxy, you'll have an extra layer of security on top of your VMs. It's equipped with fail2ban, automatic security updates and more.
To connect to a VM hidden behind the proxy, specify the jump flag -J when connecting via SSH:
ssh -J <user>@<ssh-proxy> <user>@<internal-vm>
Where <user> is your user name, <ssh-proxy> is the public IP of your SSH proxy, and <internal-vm> is the private IP of the VM you want to connect to.
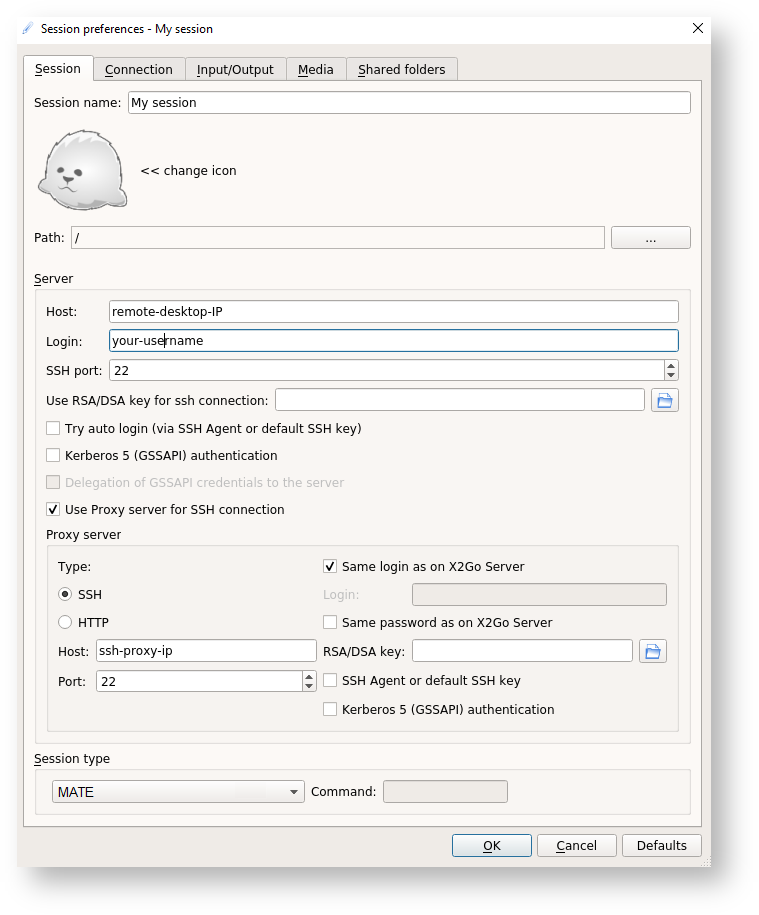
 Remote Desktop
The remote desktop is a regular Ubuntu VM equipped with X2Go; enables you to access a graphical desktop of a computer over a low bandwidth (or high bandwidth) connection.
This means that you can connect to it via the X2Go client to enjoy a regular desktop experience. To connect, launch X2Go and create a new session and specify that you want to connect through your SSH proxy as shown below.
 IPA (LDAP)
IPA functions both as an LDAP user management system and as your internal DNS nameserver. The best way to get familiar with its operation is to browse through its UI:
- Start by connecting to your Remote Desktop with the IPA admin account. For tenants onboarded to the EUMETSAT site prior to October 2025, the admin account username and password are located in Morpheus, under Tools > Cypher. → ipaadmin_username and ipaadmin_password
- Once in the Remote Desktop, launch Firefox and navigate to your IPA server by directing the browser to the IP address of the IPA server (use the URL input bar at the top).
If you're not automatically logged in, provide again the username and password of your IPA admin account (same credentials used in step 1). - Within the UI of the IPA server, you can browse around and check out its options.
- Try creating a new user by clicking + Add. You can then click on the user and insert SSH keys, reset its password and more.

Checkout How to Configure the IPA Server (LDAP and DNS) for commands you can use to create users, and more.
For tenants onboarded on the EUMETSAT site prior to October 2025, it is possible to conveniently add LDAP users by navigating to the Morpheus UI and running the workflow Create a new LDAP user, which allows you to fill in values without having to log in to the IPA server.
How to provision the Default Stack's components
If provisioning after October of 2025, we recommend deploying based on the community hub, to benefit form upcoming features or fixes.
EUMETSAT tenancies onboarded prior to October 2025 come with a pre-deployed Defaut Stack, no additional action needed for deployment.
Pre-requisites
Security Group
You may create security groups either via Morpheus UI settings OR via Community Hub Item deployment.
Create a designated security group with a descriptive name (e.g. "ipa" ) and add to it the following rules:
| Name | Direction | Rule Type | Protocol | Port Range | Source Type | Source | Destination Type | Destination Port Range |
|---|---|---|---|---|---|---|---|---|
| HTTPS | ingress | Custom Rule | TCP | 443 | Network | <private subnet IP range> | Instance | |
| HTTP | ingress | Custom Rule | TCP | 80 | Network | <private subnet IP range> | Instance | |
| SSH | ingress | Custom Rule | TCP | 22 | Network | 0.0.0.0/0 | Instance | |
| LDAP | ingress | Custom Rule | TCP | 389 | Network | <private subnet IP range> | Instance | |
| LDAPS | ingress | Custom Rule | TCP | 636 | Network | <private subnet IP range> | Instance | |
| Kerberos - Auth TCP | ingress | Custom Rule | TCP | 88 | Network | <private subnet IP range> | Instance | |
| Kerberos - Auth UDP | ingress | Custom Rule | UDP | 88 | Network | <private subnet IP range> | Instance | |
| Kerberos - Password change TCP | ingress | Custom Rule | TCP | 464 | Network | <private subnet IP range> | Instance | |
| Kerberos - Password change UDP | ingress | Custom Rule | UDP | 464 | Network | <private subnet IP range> | Instance | |
| DNS - Name resolution | ingress | Custom Rule | TCP | 53 | Network | <private subnet IP range> | Instance | |
| DNS - Autodiscovery and Enrollment | ingress | Custom Rule | UDP | 53 | Network | <private subnet IP range> | Instance | |
| NTP | ingress | Custom Rule | UDP | 123 | Network | <private subnet IP range> | Instance |
Make sure to replace the <private subnet IP range> placeholder accordingly. For example:
- If the VM will connect to the private subnet which comes out-of-the-box on EUMETSAT tenancies, you can replace with 10.0.0.0/24
- If connecting to the out-of-the-box subnet on EWCWF tenancies, replace with 192.168.1.0/24
Deployment based on the EWC Community Hub
You can provision and configure the three VMs from scratch with a single action via the corresponding EWC Community Hub Item:
Customized Deployment
When deploying flavour Items in particular, we suggest the use of the EWCCLI, as it assists you in provisioning a new VM and deploying the Item with reasonable defaults (see Deploying via ewccli).
You may opt out of one or two components from the default stack, namely the Remote Desktop or/and the SSH Bastion. You can also choose between spawning new VMs with the provisioning Items, or configure existing ones with the corresponding flavour Items:
- IPA Server Provisioning OR IPA Server Flavour (at least one of which should be deployed; requirement for LDAP/DNS functionality)
- SSH Bastion Provisioning OR SSH Bastion Flavour
- Remote Desktop Provisioning OR Remote Desktop Flavour
- IPA Client Enroll Flavour (deployment onto SSH Bastion and/or the Remote Desktop is required to enable LDAP/DNS functionality)
Day-to-day Operation
On-demand IPA enrollment and dis-enrollment
For simple on-demand enrollment/dis-enrollment of existing machines, regardless of the method used to provision them, checkout the following Items:
Integration with Morpheus UI
When an IPA Server has been successfully configured, base on the relevant EWC Community Hub Item (s), you may re-enable integration with the Morpheus UI by executing the following Item:
- IPA Client Enroll Automation Configuration: Enables the Morpheus UI to provision new VMs which get automatically enrolled into LDAP/DNS