If you wish to run interactively but are constrained by the limits on the CPUs, CPU Time or memory, you may run a small interactive job requesting the resources you want.
By doing that, you will get a dedicated allocation of CPUs and memory to run your application interactively. There are several ways to do this, depending on your use case:
Using srun directly
If you have a single script or a command you wish to run interactively, one way to do this through the batch system is with a direct call to srun from within session in the login node. It would feel as if you were running locally, but it is instead using a job with dedicated resources:
$ cat myscript.sh
#!/bin/bash
echo "This is my super script"
echo "Doing some heavy work on $HOSTNAME..."
$ ./myscript.sh
This is my super script
Doing some heavy work on at1-11...
$ srun ./myscript.sh
This is my super script
Doing some heavy work on at1-105...
In that example the submitted job would have run using the default settings (default qos, with just 1 cpu and default memory). You can of course pass additional options to srun to customise the resources allocated to this interactive job. For example, to run with 4 cpus, 12 GB with a limit of 6 hours:
$ srun -c 4 --mem=12G -t 06:00:00 ./myscript.sh
Check man srun for a complete list of options.
Persistent interactive job with ecinteractive
Those sessions run as an interactive job in the batch system, and allow you to avoid the the stricter limits on the CPUs, CPU Time or memory you find in standard interactive sessions on the login nodes.
However, note that they will be time constrained and once the job has reached it's time limit they will be closed.
JupyterHub
You may also use the ECMWF JupyterHub service to access an interactive session on the HPCF and ECS directly on your browser.
- Main Features
- Creating an interactive job
- Reattaching to an existing interactive job
- Checking the status of a running interactive job
- Killing/Cancelling a running interactive job
- Customising ecinteractive default resources
- Visual Studio Code integration
- Opening graphical applications within your interactive job
- Opening a Jupyter Lab instance
Main Features
The main features of this ecinteractive tool are the following:
- Only one interactive job is allowed at a time
- Your job keeps on running after you exit the interactive shell, so you can reattach to it any time or open multiple interactive shells within the same job.
- You may open a basic graphical desktop for X11 applications.
- You may open a Jupyter Lab instance and connect to it through your browser, although use of JupyterHub is recommended instead.
- If running on the HPCF platform, your interactive job may be scheduled to any of the four complexes. You may also choose to run on ECS.
- You can run ecinteractive from any Atos HPCF complex, ECS, and Red Hat Linux VDI. You may also copy the script to your end user device and use it from there. It should work from Linux, Mac, or WSL under windows, and requires the Teleport tsh client to be installed and configured.
$ ecinteractive -h

Usage :  /usr/local/bin/ecinteractive [options] [--]

    -d|desktop     Submits a vnc job (default is interactive ssh job)
    -j|jupyter     Submits a jupyter job (default is interactive ssh job)
    -J|jupyters     Submits a jupyter job with HTTPS support (default is interactive ssh job)

    More Options:
    -h|help        Display this message
    -v|version     Display script version
    -p|platform    Platform (default hpc. Choices: hpc, ecs)
    -u|user        ECMWF User (default usxa)
    -A|account     Project account
    -c|cpus        Number of CPUs (default 2)
    -m|memory      Requested Memory (default 8 GB)
    -s|tmpdirsize  Requested TMPDIR size (default 3 GB)
    -g|gpu         Request a GPU (limited availability)
    -t|time        Wall clock limit (default 12:00:00)
    -f|forward     Ports to forward, comma separated (default NONE)
    -e|export      Environment variables to export, comma separated (default NONE)
    -k|kill        Cancel any running interactive job
    -q|query       Check running job
    -Q|quiet       Silent mode
    -o|output      Output file for the interactive job (default /dev/null)
    -x             set -x
Before you start: Set up your SSH key-based authentication
For ecinteractive to work properly, passwordless ssh must be configured between Atos HPCF nodes. See HPC2020: How to connect for more information on how to set it up.
Creating an interactive job
You can get an interactive shell running on an allocated node within the Atos HCPF with just calling ecinteractive. Jobs will be submitted in either of these queues depending on if the user has access to the full HPC service (ni queue, for Member State users) or the ECS service (ei queue, for co-operating States, as service previously known as ECGATE) with the following default and maximum resource levels.
| QoS name | Type | Suitable for... | Shared nodes | Maximum jobs per user | Default / Max Wall Clock Limit | Default / Max CPUs | Default / Max Memory |
|---|---|---|---|---|---|---|---|
| ni | interactive | serial and small parallel interactive jobs | Yes | 1 | 12 hours / 7 days | 1 / 32 | 8 GB / 32 GB |
| ei | interactive | serial and small parallel interactive jobs - ECGATE service | Yes | 1 | 12 hours / 7 days | 1 / 4 | 8 GB / 8 GB |
If you need more resources, you may use the ecinteractive options when creating the job. For example, to get a shell with 4 cpus and 16 GB or memory for 12 hours:
[user@aa6-100 ~]$ ecinteractive -c4 -m 16G -t 12:00:00
Submitted batch job 10225018
Waiting 5 seconds for the job to be ready...
Using interactive job:
CLUSTER JOBID       STATE       EXEC_HOST  TIME_LIMIT  TIME_LEFT MAX_CPUS MIN_MEMORY TRES_PER_NODE
aa      10225018    RUNNING     aa6-104      12:00:00   11:59:55        4        16G     ssdtmp:3G

To cancel the job:
        /usr/local/bin/ecinteractive -k

Last login: Mon Dec 13 09:39:09 2021
[ECMWF-INFO-z_ecmwf_local.sh] /usr/bin/bash INTERACTIVE on aa6-104 at 20211213_093914.794, PID: 1736962, JOBID: 10225018
[ECMWF-INFO-z_ecmwf_local.sh] $SCRATCH=/ec/res4/scratch/user
[ECMWF-INFO-z_ecmwf_local.sh] $PERM=/ec/res4/perm/user
[ECMWF-INFO-z_ecmwf_local.sh] $HPCPERM=/ec/res4/hpcperm/user
[ECMWF-INFO-z_ecmwf_local.sh] $TMPDIR=/etc/ecmwf/ssd/ssd1/tmpdirs/user.10225018
[ECMWF-INFO-z_ecmwf_local.sh] $SCRATCHDIR=/ec/res4/scratchdir/user/8/10225018
[ECMWF-INFO-z_ecmwf_local.sh] $_EC_ORIG_TMPDIR=N/A
[ECMWF-INFO-z_ecmwf_local.sh] $_EC_ORIG_SCRATCHDIR=N/A
[ECMWF-INFO-z_ecmwf_local.sh] Job 10225018 time left:   11:59:54
[user@aa6-104 ~]$
If you log out, the job continues to run until explicitly cancelled or reaching the time limit.
The maximum resources you request for your interactive session are those described in the ni (or ei for ecs users) in HPC2020: Batch system.
Reattaching to an existing interactive job
Once you have an interactive job running, you may reattach to it, or open several shells within that job calling ecinteractive again.
If you have a job already running, ecinteractive will always attach you to that one regardless of the resources options you pass. If you wish to run a job with different settings, you will have to cancel it first
[user@aa6-100 ~]$ ecinteractive
Using interactive job:
CLUSTER JOBID       STATE       EXEC_HOST  TIME_LIMIT  TIME_LEFT MAX_CPUS MIN_MEMORY TRES_PER_NODE
aa      10225018    RUNNING     aa6-104      12:00:00   11:57:56        4        16G     ssdtmp:3G

WARNING: Your existing job 10225018 may have a different setup than requested. Cancel the existing job and rerun if you wish to run with different setup

To cancel the job:
        /usr/local/bin/ecinteractive -k

Last login: Mon Dec 13 09:39:14 2021 from aa6-100.bullx
[ECMWF-INFO-z_ecmwf_local.sh] /usr/bin/bash INTERACTIVE on aa6-104 at 20211213_094114.197, PID: 1742608, JOBID: 10225018
[ECMWF-INFO-z_ecmwf_local.sh] $SCRATCH=/ec/res4/scratch/user
[ECMWF-INFO-z_ecmwf_local.sh] $PERM=/ec/res4/perm/user
[ECMWF-INFO-z_ecmwf_local.sh] $HPCPERM=/ec/res4/hpcperm/user
[ECMWF-INFO-z_ecmwf_local.sh] $TMPDIR=/etc/ecmwf/ssd/ssd1/tmpdirs/user.10225018
[ECMWF-INFO-z_ecmwf_local.sh] $SCRATCHDIR=/ec/res4/scratchdir/user/8/10225018
[ECMWF-INFO-z_ecmwf_local.sh] $_EC_ORIG_TMPDIR=N/A
[ECMWF-INFO-z_ecmwf_local.sh] $_EC_ORIG_SCRATCHDIR=N/A
[ECMWF-INFO-z_ecmwf_local.sh] Job 10225018 time left:   11:57:54
[user@aa6-104 ~]$
Race conditions possbile
If you run multiple ecinteractive on different terminals with very short time between them, and you did not have an interactive job already running, you may experience some issues as multiple interactive jobs may be submitted. If that happens, it is best to cancel all of them and rerun just one ecinteractive, waiting for that one to be ready before opening other parallel sessions:
for j in $(ecsqueue -ho "%i" -u $USER -q ni); do ecscancel $j; done
Checking the status of a running interactive job
You may query ecinteractive for existing interactive jobs, and you can do so from within or outside the job. It may be useful to see how much time is left
[user@aa6-100 ~]$ ecinteractive -q
CLUSTER JOBID       STATE       EXEC_HOST  TIME_LIMIT  TIME_LEFT MAX_CPUS MIN_MEMORY TRES_PER_NODE
aa      10225018    RUNNING     aa6-104      12:00:00   11:55:40        4        16G     ssdtmp:3G
Killing/Cancelling a running interactive job
Logging out of your interactive shells spawn through ecinteractive will not cancel the job. If you have finished working with it, you should cancel it with:
[user@aa6-100 ~]$ ecinteractive -k
cancelling job 10225018...
CLUSTER JOBID       STATE       EXEC_HOST  TIME_LIMIT  TIME_LEFT MAX_CPUS MIN_MEMORY TRES_PER_NODE
aa      10225018    RUNNING     aa6-104      12:00:00   11:55:34        4        16G     ssdtmp:3G
Cancel job_id=10225018 name=user-ecinteractive partition=inter [y/n]? y
Connection to aa-login closed.
Customising ecinteractive default resources
You may override the program defaults if you always create your ecinteractive sessions with specific resource requirements by defining them in ~/.ecinteractiverc. Here is a sample file with default values that may be used as a starting point:
#Platform may be hpc or ecs
PLATFORM=hpc
# Number of CPUs
NCPUS=2
# Memory in GB
MEMORY=8
# TMPSIZE includes the SSDTMPDIR space
TMPSIZE=3
# Wall clock time limit for the session, in any valid SLURM time specification
TIME="12:00:00"
You don't need to define all the parameters, you may only define those you wish to change in respect to program defaults.
Settings precedence
Command line options always take precedence over default values, so you can always override those on specific invocations of ecinteractive with the required command line options.
Visual Studio Code integration
If you are a Visual Studio Code (VSCode) user, it is possible to use its Remote SSH extension to connect to your ecinteractive session instead of the login node to enjoy dedicated interactive resources.
Prerequisites
In order for this to work, you will need to have ecinteractive available on the platform where you run VSCode. If you are using your own computer, you need to follow these steps:
- Download the latest ecinteractive tool. Mac, and WSL are supported:Once you have it, you can always make sure it is up to date running:
curl -so ecinteractive https://git.ecmwf.int/projects/USS/repos/ecinteractive/raw/ecinteractive
chmod +x ecinteractive
./ecinteractive -U
- Make sure Teleport is properly configured for you to be able to connect via ssh to our HPCF or ECS.
No installation is required if you are using VSCode and ecinteractive from the Linux VDI, as they are both available.
Setup
You will need to make sure the following snippet is at the top of your ~/.ssh/config on the platform where you run VScode itself:
# ecinteractive dynamic host
Include ecinteractive_ssh_config
With that in place, every time you run ecinteractive from this platform, a file ~/.ssh/ecinteractive_ssh_config will be created or updated, defining a host alias "ecinteractive" pointing to the actual host running your interactive session.
Connecting VSCode to ecinteractive session
Whenever you want to use VSCode on your interactive session, you will need to run the ecinteractive command with the desired options from a separate terminal at least once, so that the "ecinteractive" host alias points to the right host. An example with default options to just update the host alias could be:
ecinteractive :
On VScode, a new host called ecinteractive will appear in your remote host list. If you select that one, a vscode remote session will be started using the resources from your ecinteractive session.
Active sessions and up-to-date host alias
Remember that if your ecinteractive session expires or you kill it, you will need to rerun ecinteractive from the same platform where you run VSCode before you can use that connection again
Opening graphical applications within your interactive job
if you need to run graphical applications, you can do so through the standard x11 forwarding.
- If running it from an Atos HPCF login node, make sure you have connected there with ssh -X and that you have a working X11 server on your end user device (i.e. XQuartz on MAC, MobaXterm, Xming or similar on Windows)
- If running it from the Red Hat Linux VDI, it should work out of the box
- If running it from your end user device, make sure you have a working X11 server on your end user device (i.e. XQuartz on MAC, MobaXterm, Xming or similar on Windows)
Alternatively, you may use ecinteractive to open a basic window manager running on the allocated interactive node, which will open a VNC client on your end to connect to the running desktop in the allocated node:
[user@aa6-100 ~]$ ecinteractive -d
Submitted batch job 10225277
Waiting 5 seconds for the job to be ready...
Using interactive job:
CLUSTER JOBID       STATE       EXEC_HOST  TIME_LIMIT  TIME_LEFT MAX_CPUS MIN_MEMORY TRES_PER_NODE
aa      10225277    RUNNING     aa6-104       6:00:00    5:59:55        2         8G     ssdtmp:3G

To cancel the job:
        /usr/local/bin/ecinteractive -k

Attaching to vnc session...
To manually re-attach:
        vncviewer -passwd ~/.vnc/passwd aa6-104:9598

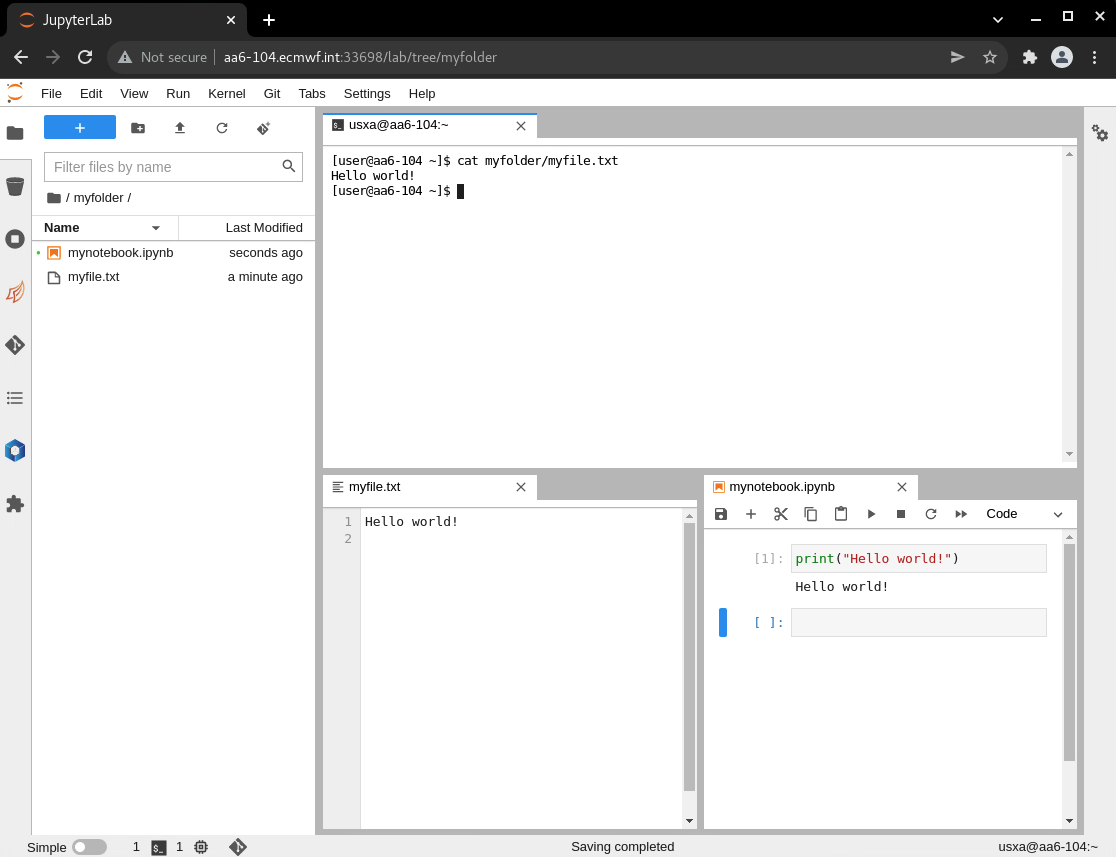
Opening a Jupyter Lab instance
JupyterHub Service
You may find it more convenient to use ECMWF's Jupyterhub instead of ecinteractive to run Jupyter on HPCF or ECS. ECMWF's Jupyterhub is the recommended way to run Jupyter at ECMWF, and only your browser is required to access this service.
[user@aa6-100 ~]$ ecinteractive -j
Using interactive job:
CLUSTER JOBID       STATE       EXEC_HOST  TIME_LIMIT  TIME_LEFT MAX_CPUS MIN_MEMORY TRES_PER_NODE
aa      10225277    RUNNING     aa6-104       6:00:00    5:58:07        2         8G     ssdtmp:3G

To cancel the job:
        /usr/local/bin/ecinteractive -k

Attaching to Jupyterlab session...
To manually re-attach go to http://aa6-104.ecmwf.int:33698/?token=b1624da17308654986b1fd66ef82b9274401ea8982f3b747
To use your own conda environment as a kernel for Jupyter notebook you will need to have ipykernel installed in the conda environment before starting ecinteractive job. ipykernel can be installed with:
[user@aa6-100 ~]$ conda activate {myEnv}
[user@aa6-100 ~]$ conda install ipykernel
[user@aa6-100 ~]$ python3 -m ipykernel install --user --name={myEnv}
The same is true if you want to make your own Python virtual environment visible in Jupyterlab
[user@aa6-100 ~]$ source {myEnv}/bin/activate
[user@aa6-100 ~]$ pip3 install ipykernel
[user@aa6-100 ~]$ python3 -m ipykernel install --user --name={myEnv}
To remove your personal kernels from Jupyterlab once you don't need them anymore, you could do so with:
jupyter kernelspec uninstall {myEnv}
HTTPS access
If you wish to run Juptyer Lab on HTTPS instead of plain HTTP, you may use the -J option in ecinteractive. In that case, a personal SSL certificate would be created under ~/.ssl the first time, and would be used to encrypt the HTTP traffic between your browser and the compute node.
In order to avoid browser security warnings, you may fetch the ~/.ssl/selfCA.crt certificate from the HPCF and import it into your browser as a trusted Certificate Authority. This is only needed once.
Customising your jupyter version and environment
By default, ecinteractive will start the jupyterlab coming from the default version of python 3. If you wish to customise the version of python or jupyterlab, or simply want to tailor its environment in your ecinteractive session, create the following file in your Atos HPCF HOME:
~/.ecinteractive/jupyter_setup.sh
Then add in it the commands needed to set up the environment so that the jupyter and node commands can be found in the path. This would be equivalent to the default behaviour:
module load python3 node
Examples of contents for ~/.ecinteractive/jupyter_setup.sh
module load python3/new node/new
module load conda
conda activate myjupyterenv