...
Assuming that the Member State ECaccess gateway (see Ecaccess concepts) runs on the server "ecaccessecaccess.meteo.ms", users connect to the application by pointing their Web browser at "http://ecaccess.meteo.ms:9080/" and will be redirected to the login page. Note that the default HTTP port number used for ECaccess is 9080.
...
- If using Internet Explorer, you will receive a security alert. You will be given an option to view the certificate. Select it, and then select the ïnstall certificate" option. Follow the instructions to install the certificate. Once you have returned to the security alert box, select the Äccept"Accept" option.
- If using Firefox or Mozilla, you will receive a security alert. Follow the instructions in the alert box to accept the certificate as certified. In the last dialogue box you will be given an option to accept this certificate for all your sessions. Select it.
...
- Browse queues: users can browse through the ëcgate" ecs and hpc queues to select a target queue for their next job request.
- Browse basket: users can select scripts from their basket for their next job request.
- Submit new jobs: users can specify complementary parameters related to the execution and confirmed action of their request. The application then submits the job request, which is sent to the job spool (equivalent of the JREQ command of the FTP plugin).
Monitoring menu
- Monitor job submissions: see section 8.1.see Monitoring batch job submissions
- Monitor secure file transfers: see section 8.2. Monitoring ectrans file transfers
- Browse the events history: the history allows saving details (date, name and summary) concerning each event for later consultation by users themselves.
...
To download a file from your current directory (./gribex in this case), click the transfer icon of the target file in the list. To upload a file into your current directory select the Üpload "Upload files" option and click the "I want to" button.
...
You may enter your script in the text area provided or select a script from your computer. Select the target queue ("hpcd" in this case). Note that the batch queue (or class) and other batch directives have to be included in your script. Alternatively, you can inform ECaccess that your script does not contain batch directives. In this case, default values will be used and ECaccess will fully manage your submission. Once your script is read, click the "Submit job" button to send your request to the server. The list of notifications allows you to attach your job to one event in the ECMWF operational suite. Please refer to the Web page on on submission of time critical jobs for further details.
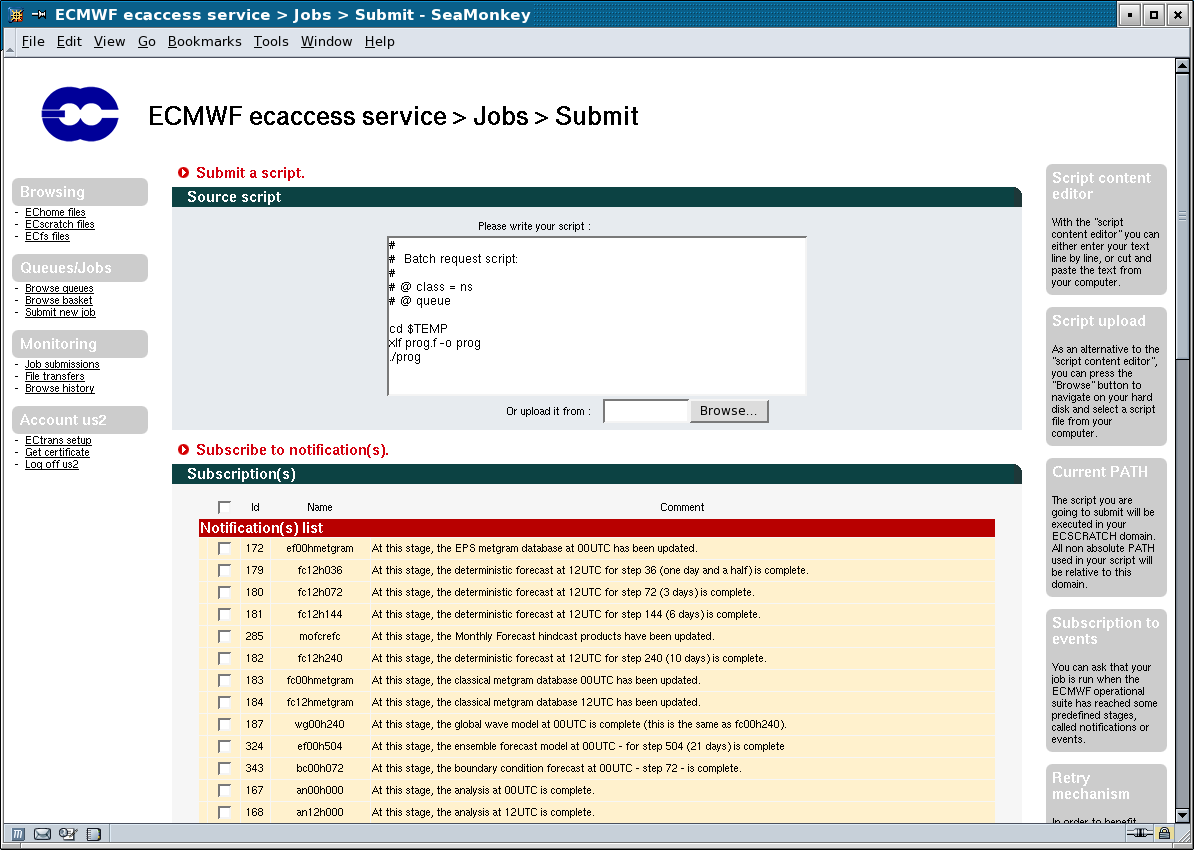
Once the job is submitted, a summary screen gives you the job identifier number of your new job request. It can be used to reference the submitted job using the monitoring interface (described in the next section). If you want to arrange a secure file transfer of the result, click the "Transfer with Ectrans after execution" button.
...
If required, modify the default values (gateway name, user identifier) and specify the erase option of the secure file transfer (erase option is discussed in section 4.2in Unattended file transfer - ectrans). Then click the "Send file(s) to your target host" to proceed.
...
The UID and name of the person you have given access to the association is now added to the list. To remove an entry from the list, click the "Remove from the list" icon on the left:

NX service
A service using the NX technology allows users to run at ECMWF X Window based applications like Metview, XCdp, or a simple xterm. The easiest way to use this service is via a web browser, see How to connect using a web browser
It is also possible to connect using a standalone NX client application completely independent of any web browser, see Example of session starting a standalone xterm on the supercomputer. A similar service is available through the ECaccess gateway "msaccess.ecmwf.int" and through your local gateway provided that you have installed the ECaccess gateway v3.3.0 at least.
NX allows you to run remote X Window sessions even across slow or low-bandwidth network connections, making it possible to start sessions from clients running on Windows, Linux, Mac OS X and Solaris platforms.
Thanks to exclusive X protocol compression techniques and an integrated set of proxy agents, NX improves the power of the X Window System to transparently run graphical desktops and applications through the network. Even on slow or low-bandwidth network connections, you can get a fast response thanks to the NX lazy encoding algorithm and NX capability to automatically tune itself to network bandwidth and latency parameters.
In addition NX allows having both standalone X terminal and "virtual desktops" independent of the web browser session used to start them. The windows can be minimised and the web browser can even be terminated.
For more information on NX, please see www.nomachine.com/documents/.
How to connect using a web browser
The easiest way to connect to ECMWF using the NX service is simply to go to: http://ecaccess.ecmwf.int/. You will get to a page like:

Using various drop down menus in the bottom part of the page you will be able to select the type of NX session you want to establish. Please note that your web browser needs to be Java enabled. You can connect to both ecgate and the supercomputer using the drop down menu "ECMWF server". You can select the type of network link you are using with the menu "Network link speed". This will select a number of options which should by optimal for your configuration. You can select the type of window you want to have using the "Window option" menu: if you select "floating window" you will get a single X Window application like xterm or Metview (you can choose the application using the next menu). If, instead, you select "virtual desktop" you will get a fully working desktop using the WindowMaker window manager. In this case you can select the "Virtual desktop resolution" to be either "available area" or "full screen".
Example of session starting a standalone xterm on the supercomputer
In this case you need to select "cca" as "ECMWF server", specify your type of network link (you can leave this to the default "adsl"), then select "floating window" as "Window option, leave the default "Floating window application" to "xterm" and press "Log on". This, after some windows warning about certificates and ssh key which you need to accept, will display the following page:

You will need to click on the "Continue" button to start the NX connection. The following window will appear:

This window allows you to enter your userid and corresponding passcode generated by your security token. After entering the appropriate information click on "Login" to proceed. The Java applet in the web browser will display various messages detailing the progress of the connection to ECMWF (depending on your firewall setup you may get various warning messages: you will need to authorise all sessions from anything related to NX - nxclient, nxauth, nxssh, etc) until this will be displayed in your browser:

The application you have requested to start, in this case an "xterm", should also start as a separate X based window. You can now minimise (or even close) your web browser and start using your xterm.

Example of session starting a virtual desktop on ecgate
In this case select the following (for the link speed you can leave the default "adsl"):

and press "Log on". The login process will be the same as the one described in the previous example but at the end the following window will appear:
Figure 1: Virtual desktop on ecgate started using NX.
...
How to connect using a standalone NX client
In addition to using the web browser based access to ECMWF via NX described previously, you can also download a standalone NX client. To do this, go to www.nomachine.com/download and select the NX client for your platform. The installation is quite straightforward and is described in more detail at www.nomachine.com/documents/client/install. You can then use the "Download session file" option available through the web interface:

This URL allows you to download a complete configuration file which can be used with your standalone NX client. You can have multiple configuration files, say one for a standalone xterm on ecgate and another one for a full virtual desktop still on ecgate, and then select the appropriate one from your NX client. Alternatively, you can use the NX client "Wizard" to setup your own configuration as described in the NX client documentation available at www.nomachine.com/documents/configuration/client-guide.php We recommend using this option for advanced users only. We also recommend that you first look at one of the configuration files which you can obtain by downloading the "session file". The first time you start the NX client the following window will appear: You will have to click "Next" where you will be asked to enter the name of your NX session (in the example <your session>) and the host to connect to. You will have to enter the ECaccess host name "ecaccess.ecmwf.int" as host: You will then get the following window where you can choose you type of desktop. You will need to choose "Unix" and "Custom": Click on "Next" to get the following window: Check the "Show the Advanced Configuration dialog" box and click the Finish button. You will get the following window: If you then click "Ok" you will be able to start your session. In this case you will get a standalone xterm on ecgate. Depending on your firewall setup you may get various warning messages. You will need to authorise all sessions from anything related to NX (nxclient, nxauth, nxssh, etc).
...
WindowMaker is a popular window manager for the X Window System, allowing graphical applications to be run on Unix-like operating-systems. It is designed to emulate NeXT's GUI as an OpenStep-compatible environment and has been described as "one of the most useful and universal window managers available." WindowMaker has a reputation for being fast, efficient and highly stable and is very popular among open source solutions for use on both newer and older machines. More information on WindowMaker can be found at http://en.wikipedia.org/wiki/Window_Maker and www.windowmaker.info. WindowMaker is the window manager which is used when you connect with NX to either ecgate or the supercomputer and select the "virtual desktop" option. For example, when you connect to ecgate using the virtual desktop you will get a desktop as shown in figure 2. The main customisation which has been implemented is a specific "Application Menu" which you can obtain when right-click (opposite mouse button for left-handed mouse) on the desktop. The menus on ecgate and the supercomputer are designed to be very similar with the one on ecgate offering more choices regarding the available applications. The usage of the menus should be quite straightforward. To terminate a WindowMaker session you need to select the "Exit" option from the menu